Thursday, 16 October 2008

My Little Christmas Tree


I used the snowflake from the Accent Essentials cartridge, cutting the bottom one at 5 and half inches, then reducing the size by 3/4" for each subsequent cut. Use cardstock at 200 gsm or more to make it sturdy.
Punch a hole through the centre of each snowflake. The main stem is dowel, but a kebab stick would be easier as it is not so thick. Then roll and glue 1 inch wide pieces of card to go between each tier.
I cut 2 of the smallest size snowflake for the top and stuck them together, leaving enough room to fit on the point of the stick.
When it was all put together I sprayed it with photo mount adhesive and showered it, (and myself, lol) with glitter.
The holder is a candle votive, I pulled out the wick and inserted the dowel in the wax ( candle sand or Oasis works well too).
The whole tree can be unassembled for storing until next Christmas.

Sunday, 12 October 2008

Fall card for US 'Addicted to cardmaking' swop


I have always wanted to try triple embossing and stamping onto the mat while the embossing was still hot. So when the I had to make Fall cards for a swop I thought I would give it a try.
I am really pleased with the result.
Here is how I did it:-
First heat emboss the mat twice with clear embossing powder I do not have any UTEE (ultra thick embossing powder, I expect you knew that) but if you have you only need to do it once) .
Make sure the mat is hot by keeping the heat gun over it and sprinkle patches of copper, bronze, gold and silver embossing powder on it, heat emboss and repeate the procedure until happy with the colour and depth. While the powder is still hot press the rubber word stamp onto a clear embossing pad and stamp on the mat.
You will need to leave the stamp on the mat until it is cool, don't worry it won't stick.
If you are doing 3 panels you need to cut them first then put them together for the embossing. They will just crack apart easily when you are done. The leaves are heat embossed as above, but I added some red powder on to some of them. As I do not have a leaf stamp I left them plain but if you have a stamp use the same procedure as the mat.
I also made some cards but using alcohol inks for the mats but forgot to take a photo of them.
I got this idea from my favourite website ;- www.thestampman.co.uk. Go and look at their Gallery it is full of great ideas. While you are there check out their stamp sets, I just bought the Lace set and can't wait to try them out.

Pink and Sassy card for UK Card Swop


Kazz, over on the Cricut Messageboard put up a card swop. The criteria was it had to be Pink and Girly. I cut the hat from Paper Dolls Dress Up and the hat stand was the snowglobe from Joys Of the Season, which I put through a brayer to give it some dimension. I made the flower following a tutorial I found on the Internet.

Saturday, 11 October 2008

One of my ATC's for the 'Winged Things' Swop


Here is a sneak peek at two of my ATC's for a swop on the Cricut MB. I have made several in different colours and styles and will post some more once the swop ends.


For the background paper I used Pearlescent Pastel Colours, from the USArt Quest watercolour palette, on ordinary printer paper. While it was wet I scrunched it up then straightened it out and left it to dry. The idea came from The Stamp Man site, one of my favourite sites.

You cannot see the effect but it is very shimmery. I added some ribbon and hearts and used the negative of a peel off on one and the positive on the other.

Friday, 10 October 2008

Hello Kitty


My granddaughter loves Hello Kitty and as she is now at an Art and Design University in London I decided to make her this birthday card. I used a dingbat and SCAL for the kitty and cupcake, and sentiment all cut with the Cricut Expression. Then I added some stickles for the bling. Adding a handle to the card made it look like a portfolio. She loved the card and did not mind that one of the whiskers was drooping!

Thursday, 9 October 2008

Love these little girls-Magnolia stamps

I love these little magnolia girl stamps and the cards Jeanette has made with them. She is giving away some fantastic blog candy. Go the her site by clicking the title of this post for a chance to win. I hope I do!!!

Wednesday, 10 September 2008

Hurrah for holidays

What a lot to do before my holiday. I have been lucky enough to be invited to stay in a french farmhouse, for free! It's in the middle of nowhere, but it does have a swimming pool.
With 4 card and ATC swops, not to mention the 'buddies' swop, on the go I need to get organised. So I'm busy getting some things together so I can take my crafting with me. Luckily most of the cutting can be done before I leave, then I can sit in the sun and craft to my hearts content-bliss. Well, I'm hoping for sun!!! it can't be any worse than our summer. I may even go looking for a French craft shop, already been on the Web to check them out.

Thursday, 4 September 2008

Wedding Card - Cricut Wedding Cartridge


I have used my favourite pearlised card for the bride's dress and the side panel. The overdress dress and veil are cut from embossed vellum and some stickles have been added to the flower centres, collar and wrist. Pearly decorative gems are used on the buttons and tiara and I have added hidden wire to the couples arms and hands to strengthen them.
The groom's suit is pearlised grey card, I added the left foot as it does not appear on the cartridge.
The inside is made up from peel off stickers, ribbon and decorated letters.
The card measures 8.75 x 8.25 inches.

Thursday, 21 August 2008

Blog Candy at going-buggy

Enfys has blog candy up for grabs, so go visit her fantastic blog for a chance to win and to see her lovely designs. http://going-buggy.blogspot.com/

Wednesday, 20 August 2008

International Swop Buddies- Cricut MB


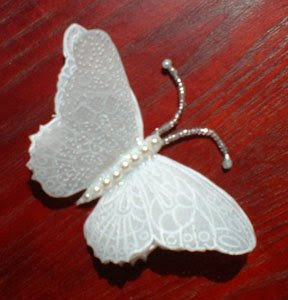
This month my swap buddie is Shan (MomofKtimes2). We have been exchanging messages and among the things I sent to her was this butterfly that I made. I stamped the butterfly on to parchment paper using Stazon Opaque Cotton White ink, then embossed the pattern. Although it does not show on the right wing I pricked through the vellum. (you can see it on the left wing)
The antennae were made using wire and beads and the body has pearl beads along it. I then added a bit of 'stickling' to finish.
I love working with parchment and although it can be time consuming the results can be amazing.
This is the other card for the Christmas in July swop.

Christmas in July Card


Here is my card for the Addicted to Cardmaking Monthly Swap on the Cricut message board http://www.cricut.com/messageboard/fb.aspx?m=2335764
I cut the circular card using the Cricut Expression and added a peel off around the edge. Then I cut the flower petals from vellum using the teardrop shape from TBBM, stickled the edges and added a ribbon. To make the card stand up I trimmed a tiny bit off the back of the card.
I have been away for so long and thought it time to update my blog!


Been really busy finishing a scrapbook for my youngest daughter and her husband's anniversary. Did not have time to take any photo's of it and now they are on holiday so I will have to wait till they return. Now I am working on an album for my SIL's 8Oth birthday in October.


I bought some Flowersoft recently and have been using it on the October cards for the Addicted to Cardmaking swop on the Cricut message board.


I really enjoyed making the August and September cards. I think the September ones (FALL) are one of my best attempts but I will not put them here as the others in the swap have not got theirs yet and I don't wan to spoil their suprise.

Friday, 18 July 2008


And then I spent a week on the Isle of Wight and visited the Lavender Farm at Staplehurst Grange. The perfume from the flowers was amazing.
I visited my sister-in-law.

It's been a busy month


My stepson John married Maria

Saturday, 28 June 2008

great blog

http://whiteribboncards.blogspot.com/
I love her style. Susie has blog candy which ends today, but go look at her site it's well worth a visit.

Saturday, 7 June 2008

18th Birthday card with champagne bottle

This was my first attempt using Paper Dolls. I cut the hair from velvet paper for texture. The lapels are glittered and cut from the Wedding cartridge. The bottle, a dingbat, it is 9.5" high and was cut with SCAL and the label is computer generated. (I forgot to put the wire on for the photograph).
The boy and the bottle are free standing, although they look as if they are on card.

Wednesday, 14 May 2008

Lacy's Shoe


This is my design for Lacy's shoe challenge. I enjoyed the challenge as I did not have a cart with a shoe on it. Scroll down for a shoe cut file. Sorry I cannot find the original file for this shoe.

Sunday, 27 April 2008

OOYCZ 2nd Challenge


When I saw these photo's on my daughter's fridge I knew I had to use them on a scrapbook page. Thanks to his dad I got copies. My daughter wrote the tag for 'Smiley Riley' and I did one for 'Love me Love my boots'. The papers were made using Photoshop Elements and the embossing was done with the Cuttlebug Paisley folder. I copied the boot and as there was only the left one showing I matted two to look like a pair. I was supposed to use ribbon but the embroidery silk matched so well I used it. All the cutting was done with my Cricut E.
I think I managed to fulfil the challenge except I did not use my alcohol inks. (maybe next time)